Scaling ArgoCD with Sharding: Efficiently Managing 1,000+ Applications
Introduction
Managing thousands of Kubernetes applications with a single ArgoCD instance can become a significant challenge. Performance issues like slow synchronization, delayed deployments, and high resource consumption are common pain points in such scenarios. If you’re grappling with these issues, implementing ArgoCD sharding might be the solution you need. In this post, we’ll explore how to efficiently manage over 1,000 applications by sharding ArgoCD using Terraform, ensuring your setup remains scalable and performant.
NOTE: This post is aimed at DevOps engineers or SREs who are managing large-scale Kubernetes environments and seeking solutions to improve the performance and scalability of their ArgoCD deployments.
Why Sharding?
As your number of applications grows, a single ArgoCD controller can become a bottleneck due to:
- High CPU and Memory Usage: The controller struggles with resource allocation, leading to performance degradation.
- Slow Synchronization Times: Increased application sync times delay your CI/CD pipeline.
- Inefficient Deployments: Handling thousands of applications becomes cumbersome and error-prone.
Reference: For more information on the benefits of sharding in ArgoCD, refer to InfraCloud’s blog post.
Sharding addresses these issues by distributing the workload across multiple ArgoCD application controllers. Each controller manages a subset of applications, improving efficiency and reducing resource contention.
Solution Overview
We’ll implement ArgoCD sharding by:
- Simulating Multiple Clusters within a single Kubernetes cluster by registering the same cluster multiple times with different namespaces.
- Configuring RBAC and Service Accounts using Terraform to ensure each controller has access only to its assigned namespaces.
- Optimizing ArgoCD Components by adjusting configurations for the Repo Server and Application Controllers.
- Automating the Setup with Terraform for scalability, repeatability, and ease of management.
Reference: For additional insights on how sharding can improve resource allocation, see the OpenShift GitOps Documentation.
Prerequisites
- An existing Kubernetes cluster with ArgoCD installed (compatible with ArgoCD v2.5+).
- Basic knowledge of Kubernetes resources and familiarity with ArgoCD.
- Terraform (v1.8+) installed on your local machine.
- Necessary permissions to apply configurations to your Kubernetes cluster.
Understanding ArgoCD Components
Before diving into the implementation, it’s essential to understand the roles of the ArgoCD components we’ll be configuring:
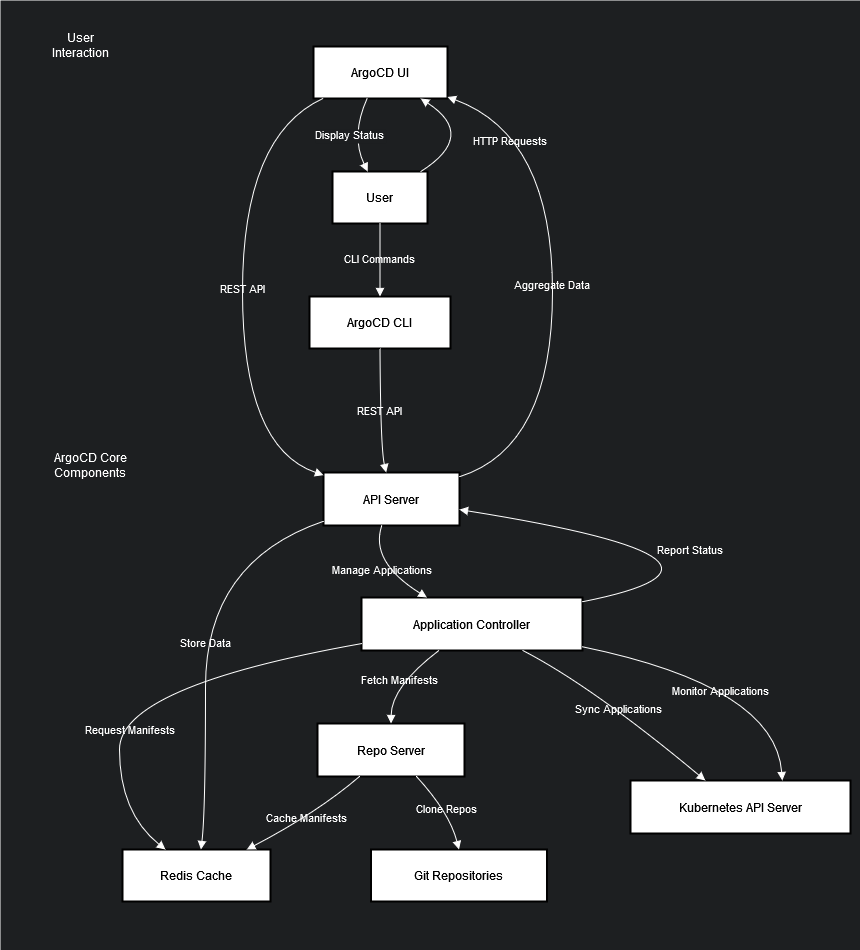
ArgoCD Repo Server
The Repo Server is responsible for:
- Cloning Git repositories containing your ArgoCD applications.
- Generating Kubernetes manifests from the application definitions.
- Caching these manifests locally and storing data in Redis for quick retrieval.
Pain Points:
- I/O Limitations During Cloning: Cloning multiple large repositories simultaneously can overwhelm the node’s I/O capacity, leading to high system load and potential node failures.
- Local Cache Storage: If the local cache exceeds the allocated storage, the Repo Server pod may be terminated due to
OOMKilled.
Solutions:
- Deployment Strategies:
- Scale the Repo Server: Increase replicas to distribute the load.
- Set Resource Requests and Limits: Define memory limits to prevent cache overflow.
- Topology Spread Constraints: Ensure pods are evenly distributed across nodes.
- Scheduled Restarts: Implement a CronJob to restart the Repo Server pods periodically, clearing the cache and preventing
OOMKillederrors.
- Configuration Adjustments:
- Environment Variables:
ARGOCD_EXEC_TIMEOUT=300s: Extend the timeout for Helm actions.ARGOCD_GIT_ATTEMPTS_COUNT=10: Increase retry attempts for Git operations.
- Parallelism Settings:
reposerver.parallelism.limit=2: Limit concurrent Helm and Git actions to reduce I/O pressure.
- Environment Variables:
- Monitoring:
- Track Git request durations and Redis call times to identify performance bottlenecks.
ArgoCD Application Controllers
The Application Controller is responsible for:
- Monitoring all ArgoCD applications in the cluster.
- Synchronizing Kubernetes resources based on the desired state defined in Git.
Pain Points:
- High Resource Consumption: Managing thousands of applications can lead to excessive CPU and memory usage.
- Synchronization Delays: Retrieving the state of numerous Kubernetes resources can be slow.
- Replica Limitations: Without sharding, scaling the controller replicas doesn’t improve performance due to conflicts.
Solutions:
- Deployment Strategies:
- Determine Shard Count: Decide how many shards to split your cluster into.
- Scale Controllers Accordingly: Set the number of controller replicas based on the shard count (
ARGOCD_CONTROLLER_REPLICAS). - Resource Requests and Limits: Define appropriate CPU and memory allocations.
- Topology Spread Constraints: Distribute controller pods evenly across nodes.
- Configuration Adjustments:
- Parallelism Settings:
controller.kubectl.parallelism.limit=100: Control the number of concurrentkubectlcommands.controller.operation.processors=25: Set concurrent operation processors.controller.status.processors=50: Define concurrent status reconciliation processors.controller.repo.server.timeout.seconds=60: Adjust Repo Server timeout.controller.self.heal.timeout.seconds=5: Set self-healing timeout.controller.sharding.algorithm=round-robin: Use round-robin algorithm for sharding.
- Exclude Resources from Reconciliation: Optimize performance by excluding non-critical resources.
- Parallelism Settings:
- Sharding Implementation:
- Namespace-Based Sharding: Divide the cluster into shards based on namespaces.
- Configure Endpoints: Set up endpoints redirecting to the Kubernetes API for each shard.
- Register Clusters in ArgoCD: Register the same cluster multiple times with different names (shards) and assigned namespaces.
- Assign Applications to Shards: Configure ArgoCD applications to use the appropriate cluster (shard).
Reference: For more detailed information on ArgoCD’s architecture and its components, refer to the official ArgoCD documentation here.
Step-by-Step Implementation
1. Clone the Terraform Project
We’ve created a Terraform project that automates the ArgoCD sharding setup. You can find the repository here.
1git clone https://github.com/B3ns44d/terraform-argocd-sharding.git
2cd terraform-argocd-sharding
This project includes all the necessary Terraform code and a detailed README that explains how to set up sharding for ArgoCD. It automates the creation of RBAC policies, service accounts, and cluster registrations, simplifying the entire process.
2. Configure Input Variables
The Terraform project includes an example.tfvars file that you can customize with your values. Update the file with your specific settings:
 1
 2# Mapping of shards to their assigned namespaces
 3shards = {
 4  shard-01 = ["namespace1", "namespace2"]
 5  shard-02 = ["namespace3", "namespace4"]
 6  shard-03 = ["namespace5", "namespace6"]
 7}
 8
 9# List of shard names
10shard_list = ["shard-01", "shard-02", "shard-03"]
11
12# The namespace where ArgoCD is deployed
13argocd_namespace = "argocd"
14
15# Kubernetes API addresses (replace with actual API addresses)
16kubernetes_api_endpoints = ["11.23.38.42", "11.23.38.43"]
17
18# ArgoCD server address and authentication token (replace with your actual values)
19argocd_server_addr = "https://argocd.example.com"
20argocd_auth_token  = "your_argocd_auth_token"
Variable Explanations:
shards: A mapping of shard names to the namespaces they manage.shard_list: A list of all shard names.argocd_namespace: The namespace where ArgoCD is deployed.kubernetes_api_endpoint: The API endpoint of your Kubernetes cluster.argocd_server_addrandargocd_auth_token: Credentials for accessing the ArgoCD API.
Obtaining the Kubernetes API Addresses (Endpoint Slice)
To retrieve the API addresses from your Kubernetes endpoint slices, you can use the following command:
1kubectl get endpointslices -n default -l kubernetes.io/service-name=kubernetes -o jsonpath='{.items[*].endpoints[*].addresses}'
This command will output a list of IP addresses for the API servers, which you can then provide as kubernetes_api_endpoints in the example.tfvars file.
Reference: For more information on Kubernetes EndpointSlice, refer to the official Kubernetes documentation here.
3. Initialize and Apply Terraform Configuration
Before applying the Terraform configuration, ensure you have the necessary permissions and that your Kubernetes context is set correctly.
Initialize the Terraform workspace:
1terraform init
Preview the changes:
1terraform plan -var-file="example.tfvars"
Apply the configuration:
1terraform apply -var-file="example.tfvars"
This process will:
- Create Service Accounts and RBAC Policies: For each shard, Terraform will create a service account and assign it permissions only to the specified namespaces.
- Register Clusters in ArgoCD: The same Kubernetes cluster will be registered multiple times in ArgoCD, each time with a different name (shard name) and limited access to certain namespaces.
- Configure Gatekeeper Assign Resources: Terraform will deploy
GatekeeperAssign resources that automatically inject the appropriateclusterNameinto ArgoCD Application manifests based on their namespace. This ensures that applications are assigned to the correct shard without manual intervention. - Configure Application Controllers: ArgoCD will be configured to distribute applications across the shards based on labels and annotations.
Reference: To learn more about Gatekeeper’s mutation capabilities and how it can be used for Kubernetes policy enforcement, check out this article from Red Hat here.
4. Optimize ArgoCD Components
Applying Configuration Parameters
The configuration parameters need to be applied to the ArgoCD ConfigMap named argocd-cm in the argocd namespace. You can modify this ConfigMap directly or use Helm if you deployed ArgoCD using the Helm chart.
Using kubectl
To edit the ConfigMap directly:
1kubectl edit configmap argocd-cm -n argocd
Add or update the configs section with the following parameters:
 1apiVersion: v1
 2kind: ConfigMap
 3metadata:
 4  name: argocd-cm
 5  namespace: argocd
 6data:
 7  configs:
 8    params:
 9      controller.kubectl.parallelism.limit: "100"
10      controller.operation.processors: "25"
11      controller.status.processors: "50"
12      controller.repo.server.timeout.seconds: "60"
13      controller.self.heal.timeout.seconds: "5"
14      controller.sharding.algorithm: "round-robin"
15      controller.resource.health.persist: "false"
16      reposerver.parallelism.limit: "2"
17      server.enable.gzip: "true"
18      argocd.exec.timeout: "300s"
19      argocd.git.attempts.count: "10"
After saving the ConfigMap, restart the ArgoCD pods to apply the changes:
1kubectl rollout restart deployment argocd-server -n argocd
2kubectl rollout restart deployment argocd-repo-server -n argocd
3kubectl rollout restart deployment argocd-application-controller -n argocd
Using Helm
If you installed ArgoCD using Helm, you can specify these parameters in your values.yaml file under the configs.params section:
 1configs:
 2  params:
 3    controller.kubectl.parallelism.limit: "100"
 4    controller.operation.processors: "25"
 5    controller.status.processors: "50"
 6    controller.repo.server.timeout.seconds: "60"
 7    controller.self.heal.timeout.seconds: "5"
 8    controller.sharding.algorithm: "round-robin"
 9    controller.resource.health.persist: "false"
10    reposerver.parallelism.limit: "2"
11    server.enable.gzip: "true"
12    argocd.exec.timeout: "300s"
13    argocd.git.attempts.count: "10"
Then, upgrade your ArgoCD release:
1helm upgrade argocd argo/argo-cd -n argocd -f values.yaml
ArgoCD Repo Server Configuration
Adjust the Repo Server deployment to mitigate the pain points:
Scaling Replicas: Increase the number of Repo Server replicas to distribute load.
1kubectl scale deployment argocd-repo-server -n argocd --replicas=3Resource Requests and Limits: Define memory limits in the Repo Server deployment.
Edit the deployment:
1kubectl edit deployment argocd-repo-server -n argocdSet the resource requests and limits:
1resources:
2  requests:
3    memory: "512Mi"
4    cpu: "250m"
5  limits:
6    memory: "1Gi"
7    cpu: "500m"
Topology Spread Constraints: Ensure pods are evenly spread across nodes by adding
topologySpreadConstraintsin the deployment spec.1topologySpreadConstraints: 2 - maxSkew: 1 3 topologyKey: kubernetes.io/hostname 4 whenUnsatisfiable: DoNotSchedule 5 labelSelector: 6 matchLabels: 7 app.kubernetes.io/name: argocd-repo-serverScheduled Restarts: Implement a CronJob to restart the Repo Server pods nightly.
Create a CronJob YAML file (
repo-server-restart-cronjob.yaml):1apiVersion: batch/v1beta1 2kind: CronJob 3metadata: 4 name: argocd-repo-server-restart 5 namespace: argocd 6spec: 7 schedule: "0 2 * * *" # Every day at 2 AM 8 jobTemplate: 9 spec: 10 template: 11 spec: 12 containers: 13 - name: restart-argocd-repo-server 14 image: bitnami/kubectl 15 command: 16 - /bin/sh 17 - -c 18 - | 19 kubectl rollout restart deployment argocd-repo-server -n argocd 20 env: 21 - name: KUBECONFIG 22 value: /root/.kube/config 23 restartPolicy: OnFailureApply the CronJob:
1kubectl apply -f repo-server-restart-cronjob.yaml
ArgoCD Application Controller Configuration
Adjust the Application Controller deployment:
Scaling Replicas: Set the number of controller replicas based on the shard count.
1kubectl scale deployment argocd-application-controller -n argocd --replicas=3Resource Requests and Limits: Define CPU and memory allocations in the deployment.
Edit the deployment:
1kubectl edit deployment argocd-application-controller -n argocdSet the resource requests and limits:
1resources:
2  requests:
3    memory: "1Gi"
4    cpu: "500m"
5  limits:
6    memory: "2Gi"
7    cpu: "1"
Topology Spread Constraints: Add
topologySpreadConstraintsto distribute pods.1topologySpreadConstraints: 2 - maxSkew: 1 3 topologyKey: kubernetes.io/hostname 4 whenUnsatisfiable: DoNotSchedule 5 labelSelector: 6 matchLabels: 7 app.kubernetes.io/name: argocd-application-controller
Reference: For more details on optimizing ArgoCD performance, refer to this article on ArgoCD Application Scalability.
5. Validate the Setup
After applying the Terraform configuration and adjusting the ArgoCD components:
Check ArgoCD Clusters: Verify that the clusters (shards) are registered in ArgoCD:
1argocd cluster listInspect RBAC Configuration: Ensure that service accounts have the correct permissions:
1kubectl describe sa shard-01 -n argocd
2kubectl describe role shard-01-role -n argocd
Monitor Synchronization: Use the ArgoCD UI or CLI to confirm that applications are syncing correctly and are distributed among the shards.
Monitor Resource Usage: Check the resource consumption of the Repo Server and Application Controllers to ensure they’re within expected limits.
1kubectl top pods -n argocdMonitor Logs: Check the logs of ArgoCD components for any errors or warnings.
1kubectl logs deployment/argocd-application-controller -n argocd
2kubectl logs deployment/argocd-repo-server -n argocd
6. Rollout to Production
The configuration changes for the ArgoCD Repo Server and Application Controllers can be rolled out progressively from development to production environments. Since these changes are internal to ArgoCD and do not directly impact application deployments, they can be applied without attaching to a specific release cycle.
Conclusion
By implementing sharding in ArgoCD using Terraform and optimizing the Repo Server and Application Controllers, we significantly improved the management of over 1,000 applications. Synchronization times decreased, resource utilization became more efficient, and the overall deployment process was streamlined. This method is scalable and can be customized for deployments of any size.
If your team is struggling to manage an ever-growing list of Kubernetes applications, consider implementing ArgoCD sharding. The provided Terraform code automates the setup, making it repeatable and easier to maintain.
References
- Terraform ArgoCD Sharding Repository
- ArgoCD Documentation - Dynamic Cluster Distribution
- Sharding Clusters Across ArgoCD Application Controller Replicas
- ArgoCD Application Scalability
- Securing ArgoCD Deployments
Further Reading
By distributing workloads across multiple controllers and automating the setup with Terraform, you can enhance the performance and scalability of your ArgoCD deployment. Implementing sharding not only improves efficiency but also ensures that your CI/CD pipeline remains robust as your application landscape grows.
Happy deploying!